Chapter 2: Playing the Game
Table of Contents
- Creating a sudoku or entering givens
- Using the keyboard
- Using the mouse
- Game modes
- Using the hint system
- Using filters
- Progress indicator
- Undo/Redo
- Using the clipboard
- Restarting a game
- Savepoints
- Saving/Loading configurations and sudokus
- Printing sudokus
- Creating images of sudokus
Creating a sudoku or entering givens
Before you can play you have to have a sudoku. There are five ways to do this:
- Let HoDoKu randomly create a new sudoku for you
- Create a sudoku manually by entering the givens
- Paste a sudoku into HoDoKu using the system clipboard
- Load a sudoku from a file ( a *.hsol file created by HoDoKu or a text file - various formats are supported)
- Use the History
Create a new sudoku

Sudoku creation is explained in detail in Chapter 4. For now the standard preferences are good enough so here is only the simple version:
- Choose the difficulty level of the new sudoku from the combo box in the tool bar (or use "Options|Difficulty")
- Press the button left of the combo box (or use "File|New Random Sudoku" or press [Ctrl]+[n])
HoDoKu creates new Sudokus randomly and checks whether they have the correct difficulty level. Sudokus with various difficulty levels are created automatically in the background, so normally the new sudoku will load immediately. If no pregenerated sudoku is available, a progress window is displayed, which shows how many sudokus were already tried. Creation of easy sudokus works almost instantly, harder sudokus can take some time. The process can be stopped any time by pressing "Cancel" in the progress window.
Enter givens
If your sudoku is printed in a newspaper or a book you have to manually enter the givens.
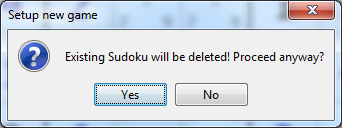
Choose "File|New Givens" from the menu. If at least one cell already contains a value a warning is displayed (see left).
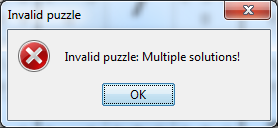
If all givens are entered in their correct cells choose "File|Play game". HoDoKu first checks whether your sudoku has a unique solution. If that is not the case a warning is displayed but the sudoku is accepted anyway.
Note: If the sudoku doesn't have a unique solution you can play anyway, you can even use the hint system, but some of the steps computed by HoDoKu will just be wrong!
If the source of your sudoku is at least halfway reliable the warning probably means that you entered something wrong (e.g. missed a given or put it in the wrong cell). If that is the case simply choose "File|Modify Givens". All cells containing a value will be shown in blue to indicate that they can be changed. Correct your error and choose "File|Play game" again.
If the sudoku has a unique solution HoDoKu will solve it and display the rating in the status bar. If one of the additional views is visible it's contents will by updated.
Use the system clipboard
Many websites or forums publish sudokus in text format (e.g. a string containing 81 characters, one for every cell). Just try pasting the string into HoDoKu. If the format can be recognised the sudoku is checked for uniqueness and solved. Using the clipboard is explained fully below.
Load a sudoku from a file
You can load a previously saved sudoku from a file (see Saving/Loading configurations and sudokus). sudokus are restored in exact the same state as they were in when they were saved.
Use the history
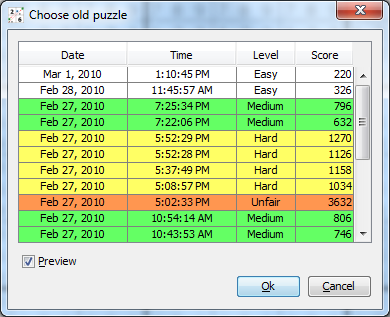
When a new sudoku is created using "File|New Random Sudoku" it is stored in the default configuration. The last 20 created sudokus are accessible via the history ("Puzzle|History"). The history dialog shows date and time, when the sudoku was created, plus its rating and difficulty level.
If "Preview" is selected in the dialog clicking a line in the table displays the sudoku and its standard solution. To keep the configuration file small only the givens are stored. That means, that the sudoku has to be solved in order to be previewed. Especially for Unfair or Extreme sudokus this may take a while. To avoid unneccessary waiting uncheck "Preview" in the dialog.
Pressing "Ok" loads the selected sudoku, pressing "Cancel" restores a previously loaded sudoku.
Using the keyboard
Normal operation
Solving sudokus using the keyboard is really straightforward. Use the arrow keys to change the cell that has the focus (yellow background) and enter a digit to set the cell to a specific value.
[Ctrl]-cursor moves to the next unsolved cell, [Home] goes to the leftmost column, [End] to the rightmost column, [Ctrl][Home] to the topmost row and [Ctrl][End] to the bottommost row.
Pressing [0] (or [Del] or [Backspace]) deletes a cell, although this is not recommended if you play with "Options|Show all candidates" and already have candidates removed (deleting a value in a cell restores the corresponding candidate in all possible cells regardless whether those candidates had already been eliminated or not - use "Undo" instead).
Pressing [Ctrl] and a digit toggles that candidate in the cell with the focus.
[Shift][Ctrl][Cursor] jumps to the next unsolved cell. If filters are applied it jumps to the next cell, that contains the filtered candidate. For more keys specific to filters see below.
Coloring
HoDoKu supports coloring. You can use five different color pairs to mark cells (the background of the cells is changed). To set a color use [A] to [E], to mark a cell with the opposite color use [Shift]+[A] to [Shift]+[E]. Pressing the same key or combination of keys on the same cell twice reverts it to it's normal background. Using colored backgrounds has no influence on the hint system, it is merely a help for you. If you are finished checking for a move press [R] to remove all colors.
Coloring candidates is only possible using the mouse (see below).
Miscellaneous
If "Options|Show all candidates" is not selected you can temporarily show all remaining candidates in the cell with the focus or in the whole sudoku. Pressing [Shift]+[Ctrl] shows all candidates for the cell with the focus, [Shift]+[Alt] shows the candidates for the whole grid.
Using the mouse
HoDoKu supports two different mouse modes: "Normal mode" and "alternate mode". "Normal mode" works as the mouse does in most programs: Clicking changes the selection, if you want to change the data you have to use double clicks or the context menu.
"Alternate mode" was designed to play using as few mouse clicks as possible. It allows for a far more fluid playing experience.
Normal mouse mode
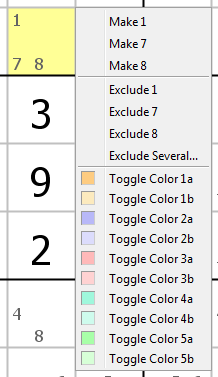
Clicking a cell with the mouse sets the focus to that cell. It is possible to select more than one cell by pressing [Ctrl] or [Shift] while clicking on a cell. Setting a value or toggeling candidates affects all selected cells.
Pressing the right mouse button on a cell brings up the context menu for that cell (see left). Values can be set ("Make n"), candidates excluded ("Exclude n") or colors set/cleared. It is not possible to color candidates using the context menu. Choosing "Exclude several..." brings up an input dialog. A list of candidates (seperated by blank) can be entered and all those candidates are removed from the cell.
Other things you can do with the mouse:
- Double clicking a candidate sets it in a cell
- Double clicking a cell, that has only one candidate left (Naked Single) sets that candidate in the cell
- If filters are applied, double clicking a cell sets the filtered candidate in the cell, if it is a Hidden Single in one of its houses
- Double clicking a candidate while pressing [Ctrl] removes it from the cell
- Double clicking the place where a candidate would be displayed (but isn't) while pressing [Ctrl] adds it to the other candidates in the cell
If you don't like double clicking, try alternate mouse mode or the Active Cell view.
If "Use [Shift] for region select" is unchecked under "Edit|Preferences|General", clicking while pressing [Shift] does not select a rectangular region of cells. It toggles candidates instead.
Alternate mouse mode
As already said above this mode was designed to let you play using as few mouse clicks as possible:
- Simply left clicking a candidate sets it in a cell
- Left clicking a cell, that has only one candidate left (Naked Single) sets that candidate in the cell
- If filters are applied, left clicking empty space in a filtered cell sets the filtered candidate in the cell, if it is a Hidden Single in one of its houses
- Right clicking a candidate removes it from the cell
- If filters are active, right clicking empty space in a filtered cell removes the filtered candidate from that cell.
- Right clicking the place where a candidate would be displayed (but isn't) adds it to the other candidates in the cell
Please note: Using alternate mouse mode with filters applied lets you play very fast. You have to be careful when using filters though: Even if a cell is filtered, clicking a candidate directly sets/eliminates that candidate, filtered or not. If you want to affect the filtered candidate, either click the candidate itself, or click empty space in the cell (the cell is divided in 9 parts of equal size, each corresponding to the candidate, that would be displayed in that area; that means, that "empty space" must be an area, that does not belong to a candidate, that is still valid).
Clicking a cell with the mouse sets the focus to that cell as well. Selecting an area by pressing [Ctrl] or [Shift] while clicking is still possible in alternate mouse mode.
Coloring
Sometimes rather complicated steps can be found easily by applying colors to cells or candidates (see Coloring). To switch between coloring cells and coloring candidates use the menu ("Options|Color cells" or "Options|Color candidates") or click the label "Coloring: Cell" ("Coloring: Candidate") in the status bar.
To color a cell/candidate click one of the colors in the palette which is displayed in the status bar. The mouse cursor changes to indicate coloring mode. Clicking a cell/candidate colors it, clicking a cell/candidate while pressing [Shift] colors it using an alternate color.
Clicking the field with the background color (usually white) or pressing [Esc] ends coloring mode, clicking the field with the "R" ends coloring mode and clears all colors.
While in coloring mode the normal mouse functions are disabled (only the context menu still works).
Active Cell view
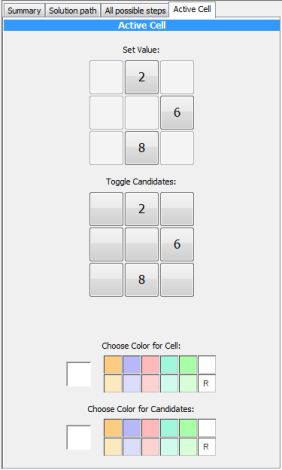
The "Active Cell" view is like a magnifying glass for the selected cell or region of cells. It allows setting of values in cells, toggeling candidates, choosing colors for coloring mode and coloring candidates.
To set a value in a cell click the corresponding number under "Set Value".
To exclude a candidate, click the candidate's number under "Toggle Candidates". To add a candidate in a cell click the corresponding empty button under "Toggle Candidates".
If a region of cells is selected adding candidates is no longer possible. The label changes from "Toggle Candidates" to "Exclude Candidates" to mirror that change.
The palette fields can be used to enter coloring mode, just like the palette in the status bar. If a color is selected from "Choose Color for Cell" the coloring mode is set to "Color Cells", if it is chosen from "Choose Color for Candidate", the mode is set to "Color Candidates".
When coloring candidates clicking a button in "Toggle Candidates" applies the color to that button.
Game modes
HoDoKu supports three different game modes (each available in Sudoku and ColorKu): Playing, learning and practising. These modes are specifically designed to allow you to practise your moves or to learn new techniques.
Playing
"Playing" is the normal game mode. It is activated by default every time you start HoDoKu.
Learning
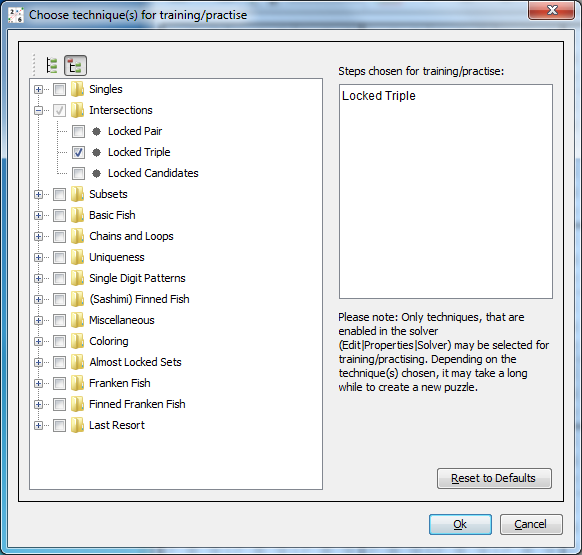
"Learning" can be activated by choosing "Mode|Learning..." from the menu. A dialog pops up that lets you choose one or more techniques (one is recommended). The mode and the name of the technique(s) are displayed in the status bar. If learning mode is active any newly created sudoku will contain at least one instance of one of the selected techniques. The sudoku is automatically solved up to the point where that technique is applicable.
There are some caveats though: Firstly you can only select techniques, that have been enabled in the solver (see Enable/Disable Techniques). Secondly since some techniques are very rare it might take a long time to actually find a sudoku that fits the requirements. It might be a good idea to move the selected technique(s) up in the solver hierarchy (see Changing order of Techniques).
Practising
"Practising" can be activated by choosing "Mode|Practising..." from the menu. As with "Learning" a dialog is displayed that lets you choose one or more techniques. Any newly created sudoku will contain at least one instance of one of the selected techniques (again as in "Learning"). The only difference to "Learning" is, that the newly created sudoku is displayed in its initial state.
Using the hint system
Getting help
Nothing is more frustrating than being stuck in a sudoku. To avoid such situations HoDoKu can give you hints about a possible next step (which step is hinted at depends on the current solver configuration, see Solver strategy).
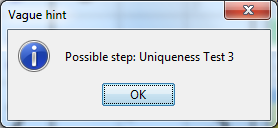
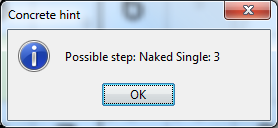
Hints come in tree flavors (all in the Puzzle menu): "Vague hint" ([Alt]+[F12]), "Concrete hint" ([Ctrl]+[F12]) and "Show next step" ([F12] or "Next hint" in the hint area).
"Vague hint" only displays the name of the step, "Concrete hint" gives more details (e.g. affected candidates) and "Show next step" highlights the step in the sudoku area and writes a textual representation into the hint area text box.
It is also possible to let HoDoKu solve all available Singles ("Puzzle|Set all singles" or [F11]).
Using the hint area
Every time a step is highlighted on the grid a textual representation of that step is written to the hint area text box. The example below shows a "Kraken Fish":

The "Next hint" button in the hint area can be used to search for the next available step (equivalent to [F12]). If a step is hightlighted, the buttons "Execute" (executes the step and ends the hightlighting) and "Cancel" (ends highlighting without executing the step) are available.
"Solve up to" automatically executes the next steps, as long they are selected under "Preferences|Progress" (see Progress). This feature allows the player to concentrate on certain steps: Just select every step you dont want to search for yourself under "Preferences Progress" and press "Solve up to".
Most steps need only one line in the hint area. Only very complicated techniques like Forcing Chains, Forcing Nets or Kraken Fish consist of various substeps that are displayed each on it's own line. Since complicated steps can affect many cells and candidates, which can make the hightlighting confusing at times, HoDoKu can display only one substep at a time. To do this, just click the line of the substep you want to see. Clicking the first line reverts the display back to showing all substeps at once. For Kraken Fish only the fish itself and the elimination(s) are shown. The chains of the Kraken Fish have to be activated by clicking the appropriate line.
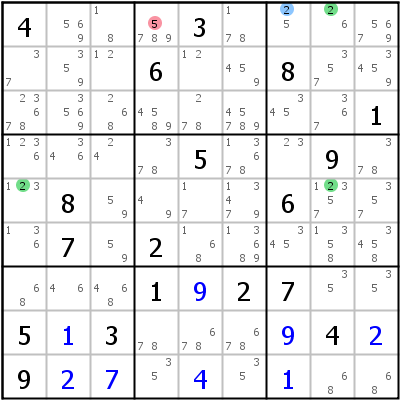
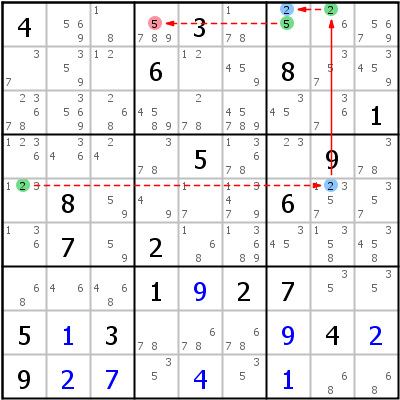
The images above show the highlighting of the Kraken Fish from the hint area screenshot. The left picture shows only the fish and the elimination (first line clicked in text area), the right image shows the fish plus the second chain (last line in text area clicked).
Using filters
Filters can be a great tool in identifying simple steps (Singles, Locked Candidates). A filter simply changes the background color to indicate whether a certain digit may be placed in a certain cell.
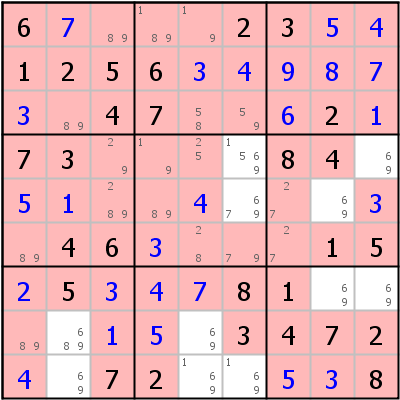
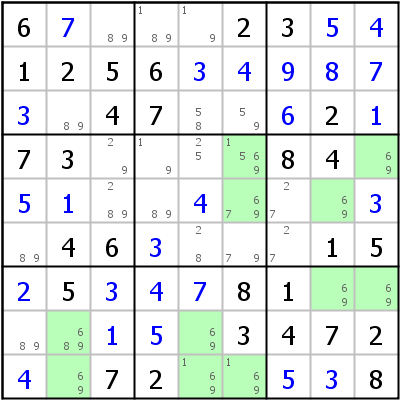
HoDoKu can use one of two filter modes: show all excluded cells for the filtered candidate in red or show all allowed cells in green. The images above show both kinds applied for digit 6. It can easily be seen that in block 5 candidate 6 can only go in column 6. 6 can therefore be eliminated from r9c6 (Locked Candidates Type 1 - Pointing).
To toggle a filter for a candidate press the appropriately numbered button in the tool bar or press [F1] to [F9] (please note that [F1] does not activate a help system).
To toggle the filter modes press the button with the red and green rectangles in the tool bar or hold down [Shift] while pressing one of the [Fx] keys.
When a filter is applied, [<] ([.]) and [>] ([,]) change the filter digit. [Blank] toggles the filtered candidate in the cell with the focus, [Enter] sets it in the cell, if it is a Naked Single or a Hidden Single for the filtered candidate.
It is possible to filter for more than one candidate: Pressing [Ctrl] while using the [Fx] keys adds/deletes candidates to/from the filter set. If more than one candidate is selected for filtering, HoDoKu filters only cells, where all candidates are excluded/possible. You can change this behaviour under "Preferences|General|Use OR instead of AND for filters": If that option is selected, all cells that (don't) contain at least one candidate are filtered.
Progress indicator

The progress indicator is located in the status bar just right of the sudoku rating. In the screenshot above, we have an unfair sudoku with a score of 1736. The progress indicator shows a yellow bullet and the text "53%". The yellow bullet means, that the sudoku still needs at least one hard step (yellow is the default color for hard), the text means, that the total score of the remaining steps is 53% of the score of the sudoku.
The progress indicator is updated after every change to the sudoku (toggling candidates or setting values in cells/deleting values from cells). HoDoKu automatically solves the sudoku in its new state and sets the indicator accordingly.
In HoDoKu's default configuration the only steps thought of as easy are singles. That means, that once the indicator's bullet becomes white (default color for "Easy"), the sudoku can be solved with Singles only. In that state, pressing [F11] solves the sudoku completely. This is of course only true, as long as the step configuration has not been changed.
Please note: The rest of the section is only meant for advanced users and is not necessary for using HoDoKu. You can skip to the next section, Undo/Redo.
The behaviour of the progress indicator can be confusing at times. In some sudokus the percentage can suddenly drop to a very small value, in other cases it can even increase after an elimination. The first case (eliminating a candidate makes the sudoku easier) is simple enough to understand: Every sudoku has one or more cells, that, when set, reduce the sudoku to singles (the "backdoors"). The solver searches for steps in a predefined order. A human solver solves more intuitive. If an elimination, that is not part of the computer solution, triggers a backdoor, the sudoku becomes very easy indeed.
The second case (eliminating a candidate makes the sudoku harder), is not so easy to understand, but it does happen. Lets take a look at the following example (provided by CCV - thanks a lot). The original sudoku is:
8......23.6.1..7.......816597..325......9..37..85.....2846.......7..1...6.......2
The sudoku is rated "Extreme" because of its high score of 2492. The hardest step in the standard solution is a Finned Swordfish (unfair). The sudoku has already been reduced to
:0000:x:8..+7+6..23.6.1..7+8.+7....816597+6.325+1.+1...9+6.37..85+1+7.+9.2846....+1..7+2.1.+4.6.......2:926 932 434 467 576 494 894 396 996::
The remaining rating is 1396, only hard steps are used to solve the sudoku, so the indicator bullet is yellow ("Hard").
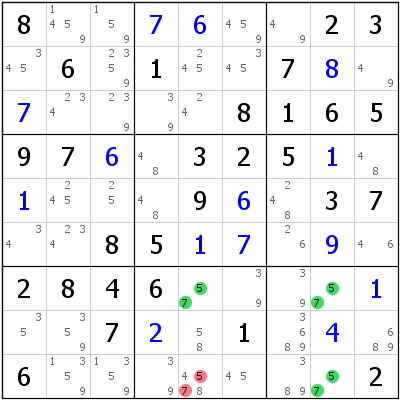
Now take a look at the screenshot: A Uniqueness Test 1 is available: 5/7 in r7c58,r9c58 => r9c5<>5, r9c5<>7.
If that step is executed, the indicator bullet remains yellow and the percentage drops a bit - that is the expected behaviour.
Now try to eliminate only candidate 7 from r9c5 (candidate 5 stays where it is): The indicator changes to "Unfair", the sudoku has suddenly become harder than it was before. How is this possible?
Let's take a look at the "normal" solution (the solution path after eliminating both candidates from r9c5):
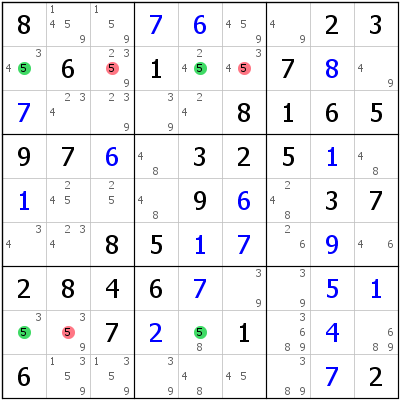
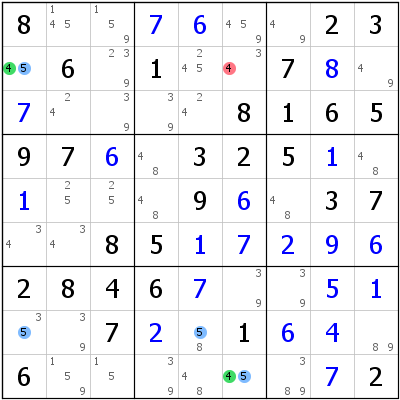
The UR 1 is followed by some Singles, after which an X-Wing becomes available: 5 c15 r28 => r2c36,r8c2<>5 (see left screenshot above). The X-Wing eliminates candidate 5 from r2c6 (amongst others).
A few steps later a W-Wing is possible (right screenshot above): 4/5 in r2c1,r9c6 connected by 5 in r8c15 => r2c6<>4. The W-Wing turns r2c6 into a Naked Single, the sudoku can now be solved with Singles and one additional W-Wing.
Now let's take a look at what happens, when only 7 is eliminated from r9c5:
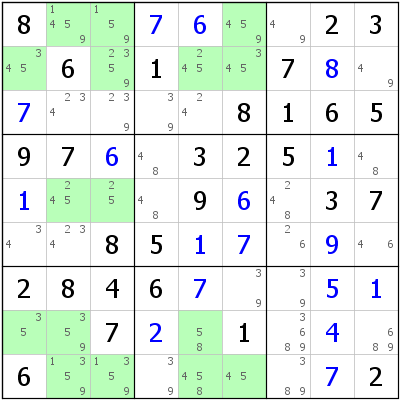
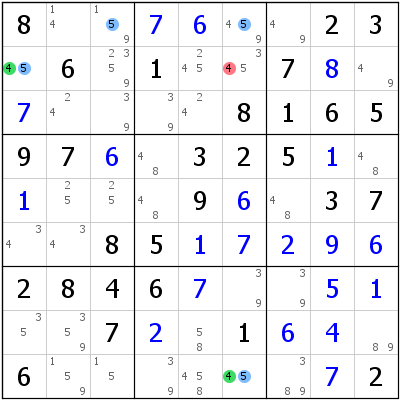
The Singles are the same as above, but where the X-Wing should be, we have the situation as shown in the left screenshot above: The remaining candidate 5 in r9c5 prevents the X-Wing, which means, that 5 is not eliminated from r2c6. The W-Wing a bit later is the same as before (see right screenshot above), but since 5 was not eliminated from r2c6 the cell does not turn into a Naked Single and the easiest step available is now an XY-Chain, which is an "Unfair" technique - the sudoku has indeed become harder.
In most cases however, the progress indicator behaves as expected and gives you a good estimate of how much work you still have to do to solve the sudoku.
Undo/Redo
HoDoKu offers an unlimited Undo/Redo function. Undo/Redo is available via the tool bar, the Edit menu or the shortcuts [Ctrl]+[Z] (Undo) and [Ctrl]+[Y] (Redo).
Undo/Redo works only for the current sudoku. If a new sudoku is created, loaded, or pasted from the clipboard the Undo function is reset. The aformentioned actions can therefore not be undone.
The Undo function is the recommended way to delete values from cells. If you play with "Options|Show invalid values" and/or "Options|Show deviations" you usually recognize an error at once. If you delete the wrong value using [0], [Del], or [Backspace], the candidates for the deleted digit are restored in all possible cells even if you have already eliminated them. The Undo function correctly only reinserts candidates that were there before the digit was entered into the cell.
Using the clipboard
The system clipboard is a convenient way to exchange sudokus between various solver programs or to input sudokus from web sites or sudoku collections. All copy operations use text representations of the sudoku.
HoDoKu supports the following copy operations:
- Copy givens ([Ctrl]+[G]): Copies only the givens (regardless of the
state of the sudoku) as 81 character string. Most solver programs recognize that
format. Example:
6....23..1256.......47...2.73....84...........46....15.5...81.......3472..72....8 - Copy values: Copies the contents of all already solved cells as 81 character string. Most solver programs recognize that format. Example see above.
- Copy candidates ([Ctrl]+[C]): Copies the current state of the
sudoku as Pencil Mark grid (PM). For every cell all possible candidates
are copied. This format is used by most sudoku forums to exchange
sudokus with other forum members. Example:
.--------------.----------------.------------.

| 6   7    89  | 189  19   2    | 3   5   4  |

| 1   2    5   | 6    3    4    | 9   8   7  |

| 3   89   4   | 7    58   59   | 6   2   1  |

:--------------+----------------+------------:

| 7   3    29  | 19   25   1569 | 8   4   69 |

| 5   1    289 | 89   4    679  | 27  69  3  |

| 89  4    6   | 3    28   79   | 27  1   5  |

:--------------+----------------+------------:

| 2   5    3   | 4    7    8    | 1   69  69 |

| 89  689  1   | 5    69   3    | 4   7   2  |

| 4   69   7   | 2    169  169  | 5   3   8  |

'--------------'----------------'------------'
- Copy step: Similar to Copy candidates, but if a step is
highlighted the affected cells are marked with special characters and the
textual representation of the step is included. Example:
.---------------.--------------------.------------.

|  6   7    89  |  189   19     2    | 3   5   4  |

|  1   2    5   |  6     3      4    | 9   8   7  |

|  3   89   4   |  7     589    59   | 6   2   1  |

:---------------+--------------------+------------:

|  7   3    29  |  159   12569  1569 | 8   4   69 |

|  5   1    289 | #89    4      679  | 27  69  3  |

| #89  4    6   |  3    #289    79   | 27  1   5  |

:---------------+--------------------+------------:

|  2   5    3   |  4     7      8    | 1   69  69 |

| #89  689  1   |  5-9   569    3    | 4   7   2  |

|  4   69   7   |  2     169    169  | 5   3   8  |

'---------------'--------------------'------------'

W-Wing: 9/8 in r5c4,r8c1 connected by 8 in r6c15 => r8c4<>9
- Copy library format: The HoDoKu library format is a proprietary format that contains information about givens, solved cells, candidates, and solving steps in a single line. It is used by the internal regression test library (see Regression Test Library).
- Copy for SimpleSudoku: Copies the grid in a format used by the SimpleSudoku program.
This format uses more than one section in the output to differentiate between
givens, user set cells and Naked Singles. If you are not using SimpleSudoku you should
use library format instead for that purpose. Example (givens, set cells, PM grid):
 *-----------*

 |6..|..2|3..|

 |125|6..|...|

 |..4|7..|.2.|

 |---+---+---|

 |73.|...|84.|

 |...|...|...|

 |.46|...|.15|

 |---+---+---|

 |.5.|..8|1..|

 |...|..3|472|

 |..7|2..|..8|

 *-----------*


 *-----------*

 |67.|..2|354|

 |125|634|987|

 |3.4|7..|621|

 |---+---+---|

 |73.|...|84.|

 |51.|.4.|..3|

 |.46|3..|.15|

 |---+---+---|

 |253|478|1..|

 |..1|..3|472|

 |4.7|2..|538|

 *-----------*


 *--------------------------------------------------------------------*

 | 6      7      89     | 189    189    2      | 3      5      4      |

 | 1      2      5      | 6      3      4      | 9      8      7      |

 | 3      89     4      | 7      589    59     | 6      2      1      |

 *----------------------+----------------------+----------------------|

 | 7      3      29     | 159    12569  1569   | 8      4      69     |

 | 5      1      289    | 89     4      679    | 27     69     3      |

 | 89     4      6      | 3      289    79     | 27     1      5      |

 *----------------------+----------------------+----------------------|

 | 2      5      3      | 4      7      8      | 1      69     69     |

 | 89     689    1      | 59     569    3      | 4      7      2      |

 | 4      69     7      | 2      169    169    | 5      3      8      |

 *--------------------------------------------------------------------*
Paste ([Ctrl]+[V]) understands any of the above formats plus a few others. Normally if the format is not decoded correctly an "Invalid sudoku: Multiple solutions!" message will be displayed.
If "Use '0' in Clipboard" is checked under "Edit|Preferences|Steps" '0' is used instead of '.' when copying sudokus to the clipboard.
Restarting a game
Restart
"Edit|Restart Game" ([Ctrl]+[R]) restarts the current sudoku from scratch. All solved cells are deleted, all solution paths in the Solution path view are deleted, a new standard solution is calculated, Undo/Redo is reset.
Reset
"Edit|Reset Game" resets the current sudoku to its initial state (all already solved cells are deleted). The solution path in the Solution path view is not changed, Undo/Redo is reset.
Solve from here
HoDoKu does not support a "Solve from here" feature because of the difficulties synchronizing the various Solution path views. Due to HoDoKu's clipboard support however a "Solve from here" function can easily be simulated:
- To solve from the current sudoku state: Use Copy library format and then Paste
- To go back to the beginning: Use Copy givens and then Paste
Savepoints
While it is probably true, that any Sudoku can be solved using logic alone, somtimes guessing is just want you want (or have) to do. If "Options|Show Deviations" is checked, errors can be recognized at once. If not, at some point the Sudoku will reach a contradiction. This is the moment where the Undo function comes in handy. But undoing a lot of steps can be cumbersome and this is where savepoints step in: A savepoint is a snapshot of a sudoku in a specific state, including solution paths, filters, coloring etc.
HoDoKu allows you to create as many savepoints as you want and to revert to any of those savepoints at any time. Savepoints are stored together with the sudoku if the Sudoku is written to a file.
Other Sudoku programs have similar features known as "second pens". The difference to savepoints is that not only the sudoku is saved (see above) and that you can set as many savepoints as you want and restore any of them at any time.
Creating savepoints
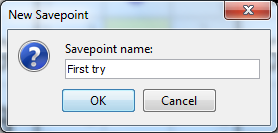
To create a savepoint choose "Puzzle|Create Savepoint" from the menu. A popup dialog asks you to enter a name, which can be used to more easily identify the savepoint if more than one savepoint is created for a sudoku. Enter a name or accept the default value and click "Ok".
The newly created savepoint contains the complete state of the sudoku: Givens, cell values, candidates, highlited steps, filters, colored cells or candidates and solution paths.
Restoring savepoints
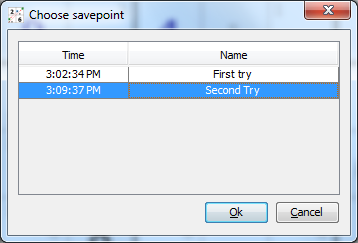
To revert a sudoku to a previously stored savepoint choose "Puzzle|Restore Savepoint" from the menu. A list with all available savepoints is displayed.
Clicking a line displays the state of that savepoint in the sudoku. If the correct line has been identified click "Ok" to load that state or click "Cancel" to continue with your current state.
Solution paths are part of a savepoint. If you have changed or added solution paths to your sudoku, those changes will be lost if you revert to another savepoint. To prevent this create a new savepoint before restoring an older one.
Saving/Loading configurations and sudokus
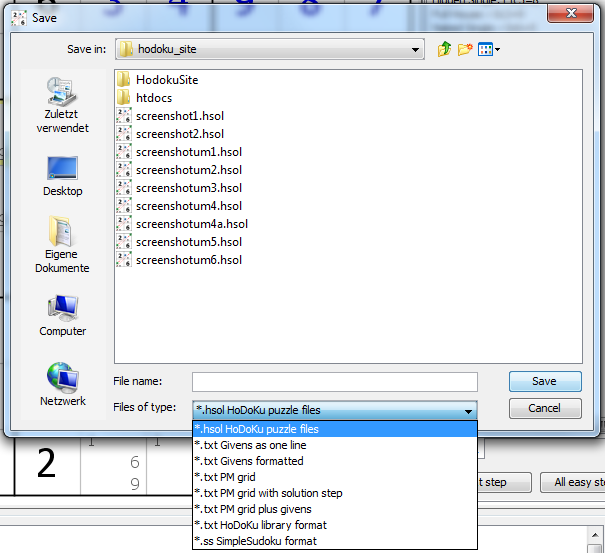
HoDoKu can save sudokus and configurations to files. Configurations are stored as XML files using the file extension "*.hcfg". Sudokus can be stored as text files (various formats supported, see screenshot on the left) or as proprietary "*.hsol" files. The various text file formats are understood by many other sudoku programs, hsol files can only be read by HoDoKu itself.
The advantage of using hsol files is, that they store not only the sudoku itself but the complete program state including solution paths and savepoints. The hsol format is therefore recommended.
Sudokus are saved via "File|Save Puzzle As..." ([Shift]+[S]) and loaded via "File|Open Puzzle File..." ([Ctrl]+[O]). If a sudoku has been loaded, the file name is shown in the window title bar. "File|Save puzzle" ([Ctrl]+[S]) saves the current state. Configurations are saved via "File|Save Configuration As..." (or loaded by "File|Open Configuration File...").
hsol and hcfg files written by HoDoKu are XML files although the ".hsol" files are zipped to reduce the file size. The XML format makes it possible for you to make changes directly in the file using a text editor. This is however strongly discouraged.
Printing sudokus
Normal operation
Sudokus can be printed exactly as they are shown on screen, one sudoku per page. Page setup and printer setup can be done using the standard dialogs of the underlying operating system.
To print the current sudoku choose "File|Print" ([Ctrl]+[P]).
Extended print
Normal printing prints one sudoku per page. If you need a more flexible tool, you can use HoDoKu's booklet printer, which is available under "File|Extended Print...".
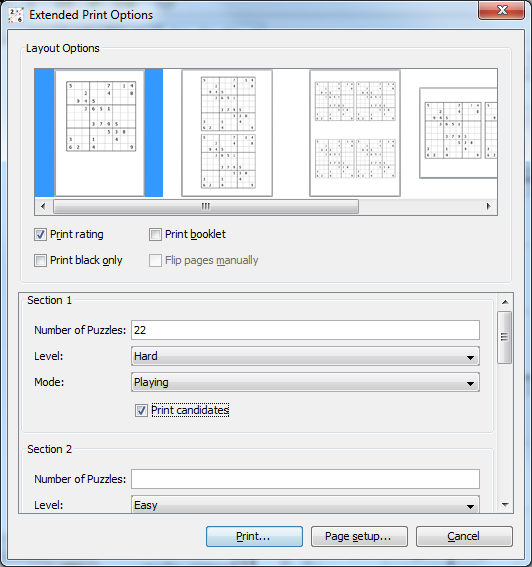
The extended print dialog offers various layouts, both in landscape and portrait orientation. Up to four sudokus can be printed per page. Various options control the printing process:
- Print rating: Prints the rating underneath each sudoku
- Print black only: Ignores the color settings and prints everything in black (increases the quality on black and white printers, which use dithering to emulate colors)
- Print booklet: The sudokus are placed on the pages in a way, that the printed pages can be folded like a booklet
- Flip pages manually: Only available when "Print booklet" is selected. Prints the front side of all pages first and lets you flip the pages manually, before printing the backs.
The contents of the booklet consists of up to five sections. Each section can consist of an arbitrary number of susokus, but all sudokus in one section have the same defining parameters (level, mode and candidates). If "Number of sudokus" is left empty in a section, the section is completely ignored. "Print..." starts the print run. Normally the sudokus have to be created first, which can last some time, depending on the section definitions. Sudokus created for extended print are added to the sudoku history (see Using the history).
The printing process can be interrupted at any time.
Please note: When printing booklets without "Flip pages manually" set, the printer has to be configured for duplex print in landscape orientation.
Creating images of sudokus
HoDoKu can produce high resolution images of the sudoku area and write them to disk in PNG format. Size and resolution for the images can be chosen arbitrarily.
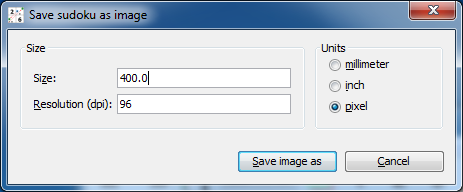
To create an image, select an appropriate unit (millimeter, inch, or pixel), a size and a resolution and press "Save image as". A file chooser dialog opens where you can specify the destination file and directory.
The resolution is written to the PNG file as image meta data. Most word processors process that information when importing images and adjust their size accordingly. Browsers normally ignore the resolution.
To create images for the web choose "pixel" as unit and "72dpi" for the resolution (the sudoku images above were created that way, "Size" was set to 400px).
If you want to use the image in a word processor choose "milimeter" or "inch" as unit and set the resolution to a higher value (e.g. "300dpi"). When importing the image at 100% the resulting size should match your choice.
Copyright © 2008-12 by Bernhard Hobiger
All material on this page is licensed under the GNU FDLv1.3.

